
Staff Image Capture
Apps that display a lock icon require VistA account credentials because they connect to the VA Electronic Health Record (EHR). To use Staff Image Capture, health care professionals must be on their VA-issued iPhone or iPad to install and launch the iOS version of the app.
 iOS Version of SIC app: You must be on your VA-issued mobile device in order to install and launch the iOS version of the Staff Image Capture app. From your VA-issued mobile device home screen, find the VA App Catalog icon (MDM.VA.gov) pictured to the right and search for search for Staff Image Capture, and tap “Install”.
Introduction
The Staff Image Capture (SIC) app allows U.S. Department of Veterans Affairs (VA) clinicians to capture clinical images with a VA-issued iPhone or iPad (Government Furnished Equipment or GFE) and save the images to a Veteran’s Electronic Health Record (EHR). The app saves images to VistA Imaging and attaches them to a Progress Note in CPRS (Computerized Patient Record System)/VistA (Veterans Health Information Systems and Technology Architecture).
The application is clean and straight forward.”
I like the multiple image capture aspect and think the upgrade is great.”
Features
- Capture clinical images of a patient
- Upload up to five images to VistA Imaging per session
- Images are attached to a Progress Note in CPRS/VistA
Instructions
Launch Requirements
To launch the Staff Image Capture app, users must follow the requirements below:
- VA-issued iOS device
- Network connection (VA Wi-Fi or Cisco AnyConnect)
- GFE Mobile Access – if using Cisco AnyConnect outside of VA Wi-Fi
- PIV-D credentials on your device
- The following VistA Menu/Key (typically assigned to all clinical staff, but can be requested via your local ADPAC, if needed). If a user can log into and access CPRS and VistA imaging, you have the appropriate access for using Staff Image Capture.
- Menu
- MAG Windows
- Key
- 885 MAGDISP CLIN
- Menu
Downloadable Materials
Training Materials

FAQs
Why should I use Staff Image Capture?
The Staff Image Capture app allows U.S. Department of Veterans Affairs (VA) clinicians to capture clinical images with their VA-issued iPhone or iPad and save the images to a Veteran’s Electronic Health Record (EHR). Staff Image Capture will save images to VistA Imaging and attach them to a Progress Note in CPRS/VistA.
What do I need to use Staff Image Capture?
To use the Staff Image Capture app, you will need the following:
- VA-issued iOS device
- Network connection (VA Wi-Fi or Cisco AnyConnect)
- GFE Mobile Access – if using Cisco AnyConnect outside of VA Wi-Fi
- PIV-D credentials on your device
- The following VistA Menu/Key (typically assigned to all clinical staff, but can be requested via your local ADPAC, if needed). If a user can log into and access CPRS and VistA imaging, you have the appropriate access for using Staff Image Capture.
- Menu
- MAG Windows
- Key
- 885 MAGDISP CLIN
- Menu
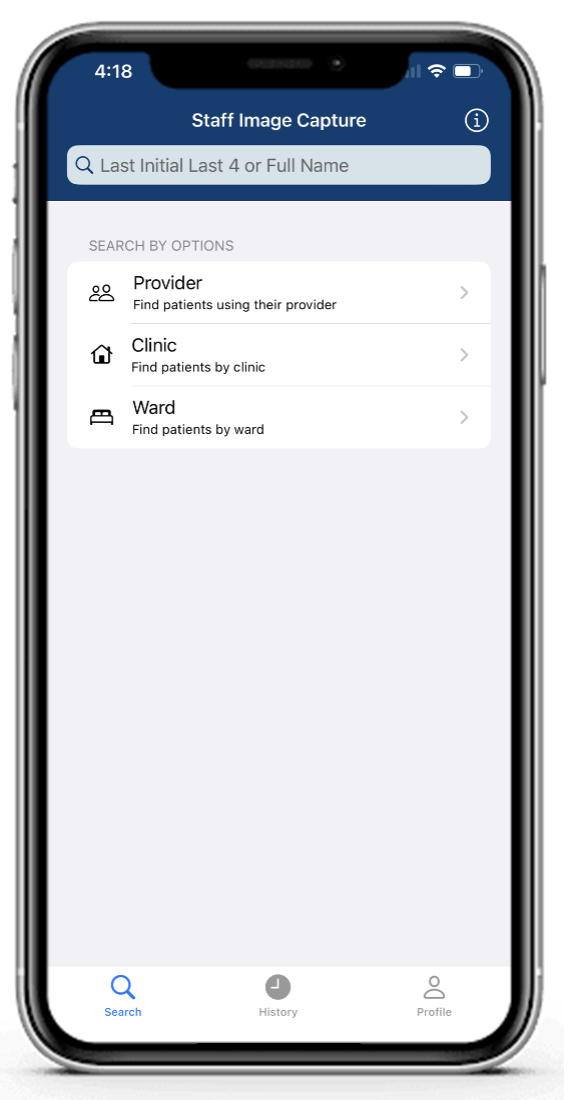
How can I search for patients?
There are several ways to search for patients using Staff Image Capture:
- First and last name.
- Last initial and last four digits of their Social Security Number.
- Search History — Find patients using your recent searches.
- Provider — Find patients using their provider.
- Clinic — Find patients by clinic.
- Ward — Find patients by ward.
Tap any of the search categories to see a list of results. You can filter the list of Search History, Provider, Clinic, or Ward results using the search box at the top of the screen.
Where can I confirm an image was successfully uploaded?
In the navigation tab, select History,then Upload history so you can see the status of your uploads within the last hour.
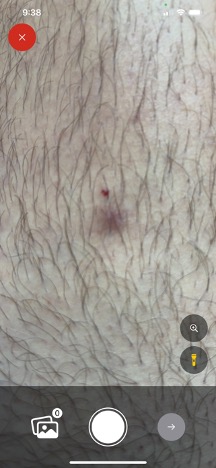
How can I capture an image?
Once you have selected a patient within the search results, tap their name to bring up the patient information screen. Tap Capture Image(s) at the bottom of the screen. A pop-up box will appear asking you to confirm that the patient has consented to having their picture taken. Tap Confirm, and a camera viewfinder will appear. Tap the white circle at the bottom of the screen to capture an image.
Can I upload multiple images?
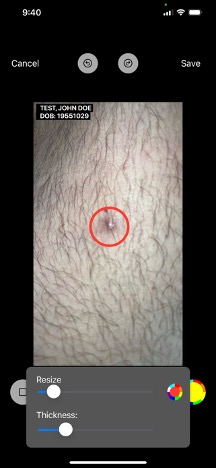
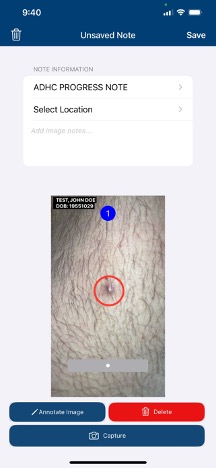
Yes. You can take up to five clinical images and upload them directly to the patient's EHR with a single consent and signature authorization. Once you confirm that the patient has consented to having their picture taken, a camera viewfinder will appear. Tap the white circle at the bottom of the screen to capture images. You will be taken to the preview screen where you can select to enter your notes for one image and sign into the patient’s EHR or tap Capture Image to return to the camera viewfinder to take up to four additional images (five total). Each image will have a unique number watermark you can reference in your notes. Tap Save to proceed with uploading the image to the patient’s EHR.
How can I add notes about an image?
After you capture the image and tap Use Photo, a Notes screen will appear. After tapping the green arrow, the app screen will display the photo(s) with the date and time they were taken and a unique number watermark on each photo to reference in your notes. If you don’t have your Note Title or Location defaults entered (on the Profile tab), tap Select Note Title to search for and select a note title. Tap Select a Location to choose a location associated with the image(s). Enter descriptive information about the image(s) in the notes section, then tap Save in the top right corner. For note titles and locations, you can filter the list of results using the search box at the top of the screen. A pop-up box will appear prompting you to sign electronically. Enter your electronic signature code, then tap Sign to upload images to VistA Imaging. The notes will appear as a Progress Note in CPRS/VistA.
How do I set my default note title and clinic location?
You can set a default note title and clinic location in the Profile section. Tap on the Profile icon in the bottom navigation bar. Then search and select your preferred default note title and clinic location. These will automatically populate on the preview screen. You can also change one or both on the preview screen.
How do I add Encounter Information to a note?
Currently, Staff Image Capture does not allow clinicians to enter Encounter Information for notes. Progress Notes are saved as Historical Visits.
Does Staff Image Capture support CPRS Note Templates?
No, Staff Image Capture does not support CPRS note templates (e.g., boilerplate or dialog template).
What is VA Mobile?
VA Mobile is a program to improve Veterans’ health by providing technologies to expand care beyond the traditional office visit. As part of VA Mobile, VA is releasing a series of secure apps that take advantage of the popularity of wireless technologies to support Veterans, caregivers, and VA care teams.
What do I do if I need additional information or help?
To access resources within the app, tap the Help icon(the letter ‘i’ in a circle) in the top right corner of the screen. If you are encountering an issue or bug, tap on Debug Info at the top right and copy it by selecting Send Debug Info, then Copy when prompted. Select the OCCHD hyperlink and log in to submit a ticket. Paste the debug information you just copied into your ticket.
Additional resources, such as an At A Glance and a Slideshow, can be found on mobile.va.gov/app/staff-image-capture.
If you need technical assistance with the Staff Image Capture app, dial 1-866-651-3180 to speak with a VA representative. For TTY assistance, dial 711. Additionally, you may visit the Office of Connected Care Help Desk Web Portal at https://occhdsupport.ironbow.com/dva for support.
Release Notes
Staff Image Capture v2.3.1:
5/19/25
- Error Handling: Have you ever experienced the app stalling out when attempting to upload your images and your progress note is uploaded, but your images are not? This occurs when the images are submitted, and something goes wrong with service responsible to receive and upload them. This patch will now display a pop modal letting you know there was a VistA Error and the give you an opportunity to retry during that active session.
Staff Image Capture v2.3:
5/6/25
- Upload Confirmation: Once you save your note, you’ll now automatically be redirected to the Upload Status page where you can confirm your upload was successful. If for some reason it fails, you’ll see “Error Loading.” Clicking this will give you details about which image failed to load.
- Enhanced Annotations: We've made some great updates to our annotation tools, making it easier than ever to mark up images with precision and clarity.
- Restricted Record Modal: Introducing the same modal you see in CPRS when you select a patient with a restricted record. This ensure you’re aware this patient has elected to have their record restricted for privacy purposes.
- VPN Connection Alerts: Never miss a beat! Now, if you're not connected to the VPN when launching the app, you'll receive a friendly reminder to connect.
- Live Progress Note Search Tips: For those using the live progress note search feature, we've added helpful messaging to remind you to enter a search term. This will streamline your search process and save you time.
- Improved Image Display: We've relocated the veteran and image identifier to the top of the image. This change ensures that your view is unobstructed, allowing for a clearer and more focused image review.
We hope these updates enhance your experience with Staff Image Capture. As always, your feedback is invaluable to us, so please let us know what you think!