
Image Viewing Solution
Apps for Health Care Professionals that display a lock icon require VistA account credentials because they connect to the VA Electronic Health Record (EHR).
If you receive an error message stating “No VistA Sites Found” when attempting to launch IVS, please check that you are using the correct IVS URL: https://vaivsresmd.mobilehealth.va.gov/.
For assistance creating a Chrome Bookmark or Edge Browser Favorite for IVS, follow the instructions on the applicable help document (Chrome Bookmark Creation Steps, Edge Browser Favorite Creation Steps).
Last Updated: 02/11/2021 3:00 p.m. ET
Introduction
The Image Viewing Solution (IVS) mobile application (app) allows U.S. Department of Veterans Affairs (VA) clinicians and other medical professionals to search for and view patients’ clinical images. The IVS aggregates images from VA enterprise medical facilities, offering easily accessible diagnostic-grade images, capabilities to work with images (e.g., scrolling, panning, zooming, adjusting window/level) and a tool to collaborate with other VA clinical staff.
The IVS app protects Personally Identifiable Information (PII) and Protected Health Information (PHI) as well as the fidelity of the image, ensuring IVS usage is HIPAA compliant and that images cannot be manipulated.
- Web version: You must be on the VA network to launch IVS through your browser.
- iOS version: You must be on your VA-issued mobile device to install and launch IVS. From the home screen of your VA-issued mobile device, find the VA App Catalog icon (MDM.VA.gov) and search for IVS.
Features
- Find patients by searching specific archives or all of VA’s databases
- View and work with images in the IVS Study Browser
- Collaborate with other health care professionals
- View images from different perspectives (e.g., 2D, MIP/MPR, 3D)
- Work with images in a variety of ways, such as zooming, flipping, highlighting and measuring on an image
Outreach Materials
Image Viewing Solution Promotional Toolkit
VA providers and other VA staff can use this toolkit to raise awareness about and promote the use of the Image Viewing Solution app. Outreach materials for other apps can be found in the Connected Care Promotional Toolkit Directory.
VA network access is required to view the Promotional Toolkit Directory.
Training Materials
FAQs
Why should I use the IVS?
Image Viewing Solution (IVS) Mobile (iOS) and Web apps allow Department of Veterans Affairs (VA) clinicians to access, view, and work with diagnostic-grade images. With IVS, you can scroll through image slices, adjust the window level, measure and zoom, mirror, and make notes. IVS protects Personally Identifiable Information (PII) and Protected Health Information (PHI) as well as the fidelity of the image. Images can be viewed in 2D, MIP/MPR or 3D.
Who can use the IVS?
To use IVS, you must be a VA health care professional with credentials for the Veterans Health Information Systems and Technology Architecture (VistA).
What web browsers support the IVS web app?
You can use the IVS web app with Chrome, Edge and Safari browsers.
What are the main features of the IVS?
With IVS you can view and manipulate images in three different ways: 2D, MIP/MPR and 3D.
How do I find the images I want to view?
When you log into IVS, the search will default to Search options. Fill out one or more of the following fields: patient name, modality, date range or a specific repository/archive (for iOS). Select Search to open the Search Results showing all patient entries that match your search criteria.
NOTE: Patient ID and Accession Number should not be used in IVS.
How do I navigate the image I’m viewing?
In the web app, you can navigate images in the Image Viewer with the navigation tools. In the top left corner of the image under Navigate, click one of the following, and your cursor will change to that icon. You can manipulate the image in the following ways:
- Scroll (several lines with an up and down arrows icon) – When selected, click and drag up and down to scroll through the images in a series. This view is available for 2D and MIP/MPR view modes only.
- Zoom (magnifying glass with a + icon) – When selected, click and drag up and down to zoom in and out of the image.
- Window/Level (half shaded sun icon) – When selected, click and drag left and right or up and down to adjust window level.
In the mobile app, you can navigate images using gestures to create actions. Gestures are described in the Help section of the 9-square menu. Navigate the images in the following ways:
- 2D - Slice +/- – Tap and hold the white bar on the right side of the screen, then move your finger up and down to scroll through an image series.
- Zoom – Tap and hold two fingers on the screen simultaneously, the move them outward in opposite directions to zoom in on an area.
- Window/Level - Double tap and hold, then drag up, down, left or right to adjust window level.
- MIP/MPR Change View – Tap and hold the screen, then drag left or right to change view.
- 3D - Rotate – Tap and hold the screen, then drag in any direction to rotate the image.
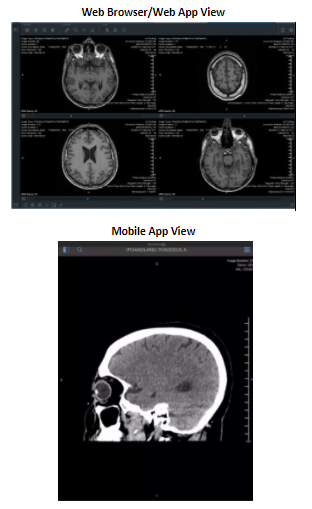
Can I view multiple images at the same time?
Yes. To view multiple images at the same time in the web app, select the separate studies you would like to view and click Add to Worklist, then click and drag the images into the panes. The patient’s data can be divided into two vertical, two horizontal or four separate panes. By clicking on the buttons on the bottom left of the screen, you can change the way the images are presented:
- Link Views (chain icon) – In 2D mode, you can scroll through images by moving the wheel of your mouse, and you may view up to four images at one time. If you are viewing two or more images at one time, you can link your views together so that when you scroll through one image, the other images scroll simultaneously. You can unlink your views to scroll through one image while the others remain fixed.
- 1x1 Layout (box icon) – One image.
- 1x2 Layout (vertical rectangles icon) – Two images side by side.
- 2x1 Layout (horizontal rectangles icon) – Two images stacked top and bottom.
- 2x2 Layout (four squares icon) – Four images in a square.
To view multiple images at the same time in the mobile app, tap the 9-square menu, then tap Split View. While using this function, tap the Studies icon in the top left corner of the screen and tap on the first image series you would like to view to load it into the first pane. Then select a second study and tap on the image series you would like to view to load it in the second pane. A pop-up window will appear with four blue rectangular panes with a check mark in the pane where the first image series is loaded. Tap the pane in which you would like to load the second image series in order to view the two series side by side or stacked top and bottom. You can load up to two image series at a time in the mobile app.
To link views in the mobile app, tap the 9-square menu, then tap Link on Position. This will allow you to scroll through multiple image series simultaneously.
How do I measure linear distance?
To begin a linear measurement in the web app, click the ruler icon under Measure. Your cursor will change to a + icon. Click on the image where you would like to start drawing a line. Hold down and drag your cursor to where you would like to end your line. Release your mouse, and the distance between the two points will be calculated both next to the line and in the measurement box. You can adjust the line by clicking on an end point and dragging it to a new location.
In the mobile app, tap the 9-square menu, then tap Measure. A toolbar with icons will appear at the bottom of the screen. Tap the ruler icon (first icon on the left). Tap and hold any point on the image until the point turns green, then drag to the distance you want to measure and hold until the point turns green again before releasing. The distance between the two points will be calculated next to the line.
NOTE: Measurements are not stored and do not persist on the image.
How do I measure a region of interest (ROI)?
To begin a region of interest measurement in the web app, click the ellipse-plus icon under Measure. Your cursor will change to a + icon. Click on the image near the region you would like to measure. Hold down and drag your cursor, and a box with an oval inside will appear. Release your cursor when the box and oval have covered the region you would like to measure.
In the mobile app, tap the 9-square menu, then tap Measure. A toolbar with icons will appear at the bottom of the screen. Tap the second icon from the left (the oval with a + sign). Tap and hold near the region you would like to measure. A box with an oval inside will appear. Release your finger when the box and oval have covered the region you would like the measure.
In both app versions, the measurements for Mean, Std Dev (standard deviation) and Area will be calculated both next to your drawn box and in the measurement box. You can adjust the box by clicking or tapping on the corners and dragging it to a new location.
NOTE: Measurements are not stored and do not persist on the image.
How do I measure an angle?
To begin an angle measurement, select the icon that shows an angle with a degree symbol in the center. Click or tap on the image where you would like to measure the angle. Click or tap on the points at the vertex and the arms of the angle and drag until the angle faces and covers the region you would like to measure. The degrees will be calculated both next to the angle’s vertex and in the measurement box.
NOTE: Measurements are not stored and do not persist on the image.
Can I make annotations and markup the image I am viewing?
Yes. The Markup tool allows you to create text boxes to type temporary notes. To annotate using the web app, click the A icon. A pop-up Measurement/Markup box will appear with two options: Annotate and Freehand. By clicking Annotate, a cursor will appear that you can place in the desired location on the image to type your note.
NOTE: This feature is only available in the web app. Annotations are not stored and do not persist on the image.
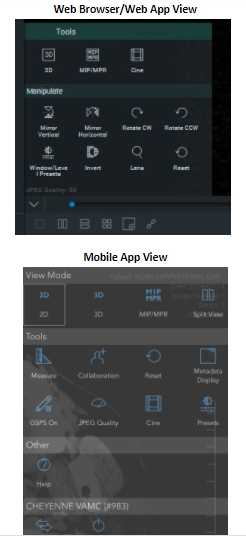
What can I do to manipulate the image?
To manipulate the image in the web app, including magnifying, using preset views and resetting the image, click the three-line icon at the bottom left of the image and the Tools menu will appear. Under Manipulate, click on the way in which you would like to manipulate the image. Some examples of how to manipulate the image are:
- Reset – Only the image you are accessing the Tools menu from will reset.
- Window/Level Presets – Several preset views will appear. These presets are to view certain elements or materials within an image, such as soft tissue or bone. For 2D images, click the preset you would like to use, and the width and level will adjust accordingly.
- Lens – A magnifying glass tool will appear. Click and drag to move the magnifying glass across the image.
NOTE: The Lens feature is only available in 2D mode in the web app.
To manipulate the image in the mobile app, tap the 9-square menu, then tap the feature you would like to use under the Tools section. You can manipulate the image in the following ways:
- Reset – Only the image you are accessing the Tools menu from will reset.
- Presets – Several preset views will appear. Tap the preset you would like to use, and the width and level will adjust accordingly.
- Lens – A magnifying glass tool will appear. Tap and hold, then drag to move the magnifying glass across the image.
NOTE: The Lens feature is only available in 3D mode in the mobile app.
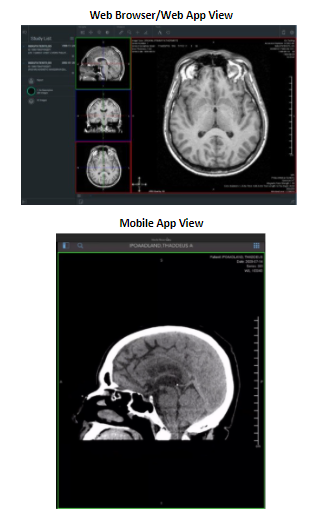
What is the MIP/MPR view, and how do I view my images in that view?
The MIP/MPR (maximum-intensity projection/multiplanar reconstruction) view allows you to see and interact with cross sections of 2D images. When you load images into the Image Viewer, the view will default to 2D.
To change the view in the web app, click on the three-line icon at the bottom of the image. The Tool menu will appear. Click MIP/MPR. The MIP/MPR screen is divided into four images: three small images in a vertical strip on the left, and one large image on the right. The small images on the left show three perspectives and are color coded:
- Green - Slices taken from left to right (sagittal).
- Blue - Slices taken from front to back (coronal).
- Red - Slices taken from top to bottom (axial).
The larger image will be a close-up of one of the smaller images. Double-clicking on a small image will change the image in the big window for viewing. To emphasize from which perspective the larger image is being viewed, the larger image outline will match the color (green, blue or red) of the small image it duplicates. Any changes made to one image will be reflected in the other images of the series being viewed.
To change the view in the mobile app, tap the 9-square menu, then under View Mode tap MIP/MPR. The MIP/MPR screen will display a single image with a colored box around it. The color code for the assorted views is the same as in the web app. To change to a different view, swipe right or left on the screen. The box around the image will change color in accordance with the view that is selected.
How do I manipulate the planes?
In each of the small images on the left, there are two perpendicular positional lines that represent the cross sections or slices you are viewing. You can move lines to view the image from different perspectives. To change the view, you can:
- Move a plane perpendicularly or in parallel orthogonally – Click on any solid part of the perpendicular positional lines over the image. Hold down and drag up, down, right or left to reposition.
- Freely move positional lines – Click on the center of the cross hair at the bottom left of the large image and drag.
- Re-center the positional lines – Click on the intersection of the perpendicular positional lines. Hold down and drag to reposition.
- Triangulate a point – When using the web app, hold down Ctrl (or Command on a Mac) and click anywhere on any of the three smaller images in the strip view. The point will be reflected in the other two smaller images, and the large image on the right will adjust accordingly.
NOTE: This feature is only available in the web app.
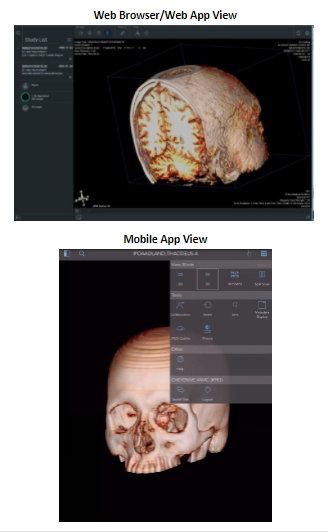
How do I view my images in a 3D view?
When you load images into the Image Viewer, the view will default to 2D. To change the view in the web app, click on the three-line icon in the bottom left of the image to display Tools, then click 3D. To change the view in the mobile app, tap the nine-square icon in the top right corner of the work area to open the menu, then tap 3D under View Mode.
NOTE: Only image studies with multiple slices (e.g., CT scans and MRIs) can be viewed in 3D mode.
How do I magnify part of a 3D image?
The lens feature allows you to magnify a section of a 3D image while keeping the entire volume in the main view. To use this feature in the web app, press the O key and click on the area you would like to magnify. The magnified area will appear in a circular lens. You can then:
- Move the lens over the volume – Left click on the magnified area in the lens and hold down. Drag the lens to reposition.
- Move the lens through volume – Click on the magnified part of the lens and scroll the wheel of your mouse up or down to push the lens deeper into the volume and back out.
- Adjust the level of the lens’s magnification – Click on the magnified part of the image in the circular lens. Scroll the wheel of your mouse up to increase magnification or scroll the wheel of your mouse down to decrease magnification.
To use this feature in the mobile app, tap the 9-square menu and make sure that you have selected the 3D view mode. Under the Tools section, tap Lens. Tap and hold your finger on the screen over the area you would like to magnify, then slide your finger over the image to magnify different areas of the image.
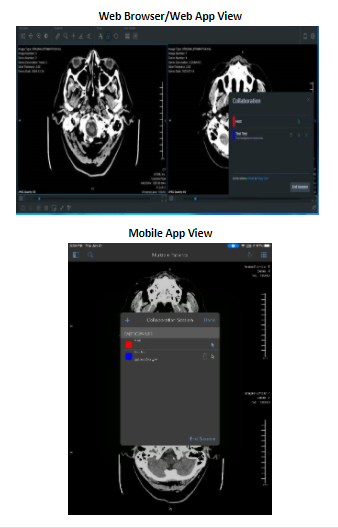
Can I use the IVS to collaborate with others?
Yes. Collaboration allows multiple physicians to view a patient’s images simultaneously and offer feedback.
NOTE: When collaborating, only the host’s images will be of diagnostic quality.
How do I host a collaboration session?
To host a collaboration session, select Collaboration (the person with a + icon) in the bottom right corner of the web app. To access this feature in the mobile app, tap the 9-square menu and under the Tools section, tap Collaboration. A pop-up Collaboration box will appear. Select Start Session. As a host, you can send invites, allow participants to interact with the images, and end the session.
NOTE: Each collaboration session has its own link, so once you end a session, you cannot use the same link again to host or enter a collaboration session. You must send new invites by email or by copying the session link and sending it to collaborators using email or a tool like Skype for the collaborators to join the session.
How do I join a collaboration session?
In order to join a session, you must have received an emailed invite for the session, or the link has been sent to you by another method e.g., “Copy Link” and received by instance message. Open the emailed invite and click the link to the session provided in the email. A pop-up Participant Info box will appear. Type your name and email address and click Join. You will enter the meeting and be able to see the host’s screen.
Where can I find additional information about other available VA Mobile Apps?
Additional information about other available VA Apps can be found on mobile.va.gov/appstore as well as mobile.va.gov.
What do I do if I need additional information or help?
IVS offers a built-in User Guide. To access the built in User Guide in the web app, click the Image Viewer icon (person with x-ray) in the top left corner to go to the Image Viewer screen. Click the book icon in the top right of your screen, and a User Guide will open in another window. To access the User Guide in the mobile app, tap the 9-square menu in the top right corner of the screen. Under the Other section, tap Help. At the bottom of the Help screen, tap User Guide.
More resources, such as a Slideshow and FAQs, can be found on mobile.va.gov/app/image-viewing-solution. If you need assistance with IVS, dial (866) 651-3180 to speak with a VA representative. For TTY assistance, dial 711.
Help
For help with this app, contact the OCC Help Desk at:
Call: 866-651-3180
Hours: 24 hours a day, 7 days a week.